I have posted a more up to date version of this post. I have found that a couple of steps in this process were left out of the writeup, so I created a new posting from start to finish. While you may still find what you are looking for in this post, I strongly encourage you to read the new one if you are having issues getting claims set up.
https://shannonbray.wordpress.com/2010/10/02/claims-based-authentication-made-simple/.
———————————————————————————————————————————–
In this session, we will now move onto configuring Claims Based Authentication for our internal farm. If you are unsure where to start in the process, please refer back to one of the previous posts:
- SharePoint 2010 Machine Configurations
- Laptop Configurations
- Configuring Windows Server 2008 for Virtualization
- Configuring RRAS for Windows Server 2008 R2
- Building Your SharePoint 2010 Infrastructure
- Creating Your Web Application
- Configuring Kerberos
Before we dive into the step by step process, let’s first examine what happens during a “claim” authentication. This will be very useful, should you need to debug your environment to find out what piece isn’t working the way you expect.

- Client, web browser or Office 2010, makes a resource request to SharePoint
- SharePoint responds and tells the client that it is unauthenticated and passes a url to the client so that the client knows where to go to get authenticated.
- The client then requests authentication from the Identity Provider Security Token Server (IP-STS) AD, SAML, etc
- IP-STS returns a security token (Windows NT token, Forms, SAML etc.) to the client.
- Client passes the newly acquired security token back to SharePoint.
- SharePoint decides if it trusts the issuer of the token, if it does, performs Claims augmentation and gets claim info, in the form of a new token.
- Client then passes new token to SharePoint, SharePoint then converts the augmented claim into a SPUser and grants access.
– SPC307, SharePoint Conference Oct. 2009
I would also recommend looking at Spence’s claims presentation available here. Now that we have a basic understanding of the steps, let’s put them in place. You will also need to download the latest version of AD FS 2.0. At the time of this article, there are versions for Windows Server 2008 and Windows Server 2008 R2. I will be using the R2 version in the following steps.

Once you have it downloaded, run the setup file and step through the wizard.

For the ‘Server Role’, I chose ‘Federation server’. This is because this environment or lab will not be incorporating any firewalls and simulating a perimeter network.

From here, we are now ready to configure the federation server. Click on the link ‘AD FS 2.0 Federation Server Configuration Wizard’ and follow along with the screenshots below:


Once we complete the wizard, we will enter into the Internet Information Services (IIS) Manager. Click on the server name in the left hand pane (ie. MCM-ADFS). You will now click on ‘Create Self-Signed Certificate’. This will launch a wizard that creates a certificate that we will use to establish communications between our ADFS and our SharePoint server. In this example, I name my certificate ‘adfs.mcm.lab.internal’.

If you have been following along through the entire series, you would have created a ‘Certificates’ folder on the SharePoint server. We will now need to create one on the AD FS server. I created mine directly on C.
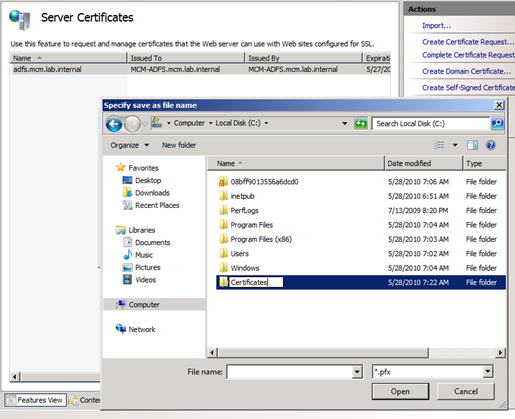
Now that we have a location to save the new certificate to, export it to the newly created folder. You will need to enter a password. For this example, I used ‘pass@word1’.

You will now import your certificate into your ‘Trusted Root Certification Authorities’. You can get here by typing ‘MMC’ into the search box and adding ‘Certificates’ as a snap-in.

Once this certificate is in place, I hit the previous button and then next. This will populate the ‘Federation Service Name’ details as indicated below.

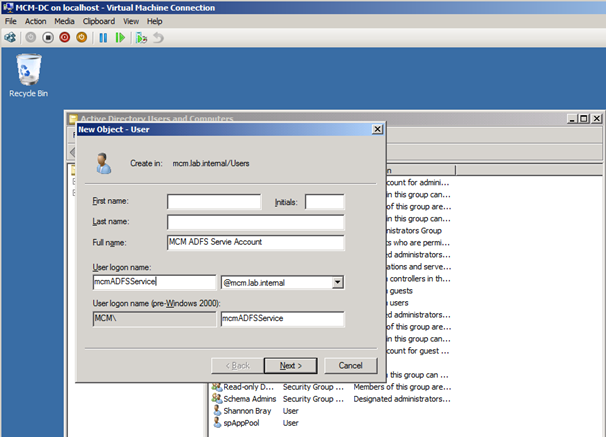
Open up your domain controller and create a new user. For this demo, I created ‘mcmADFSService’.
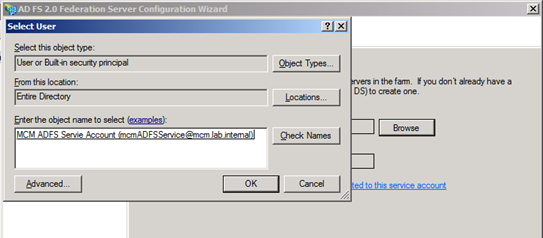
We can then add the new user in the next step of our wizard: Specify a Service Account.

Click through the remainder of the Wizard.

As you complete the wizard, you may get an error in the ‘Configure service settings’. This notify you to create a SPN for the ADFS service account.


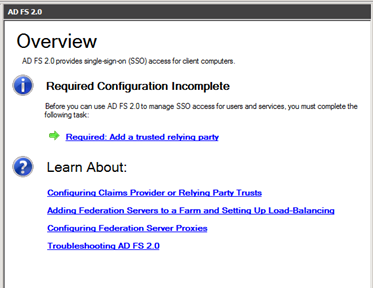
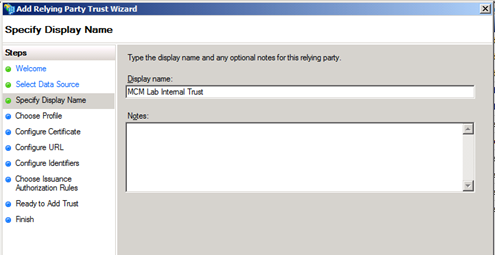
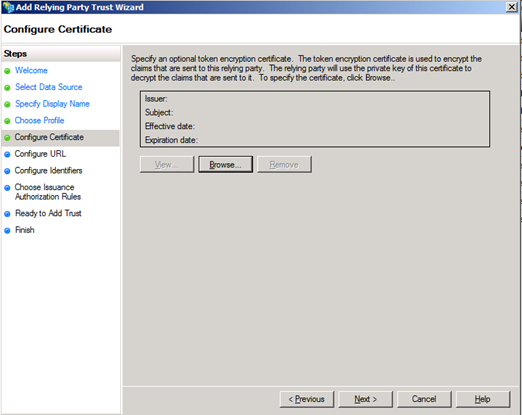
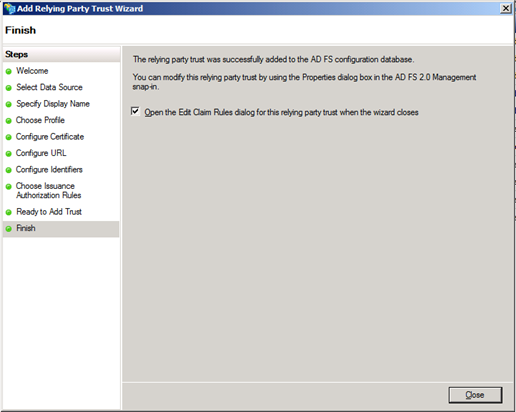
We are now ready to add a trusted relying party. Click on the link and follow along with the screenshots.

We will be creating my own relying party, so select “Enter data about the relying party manually”. I have included screen shots of the steps I took below.


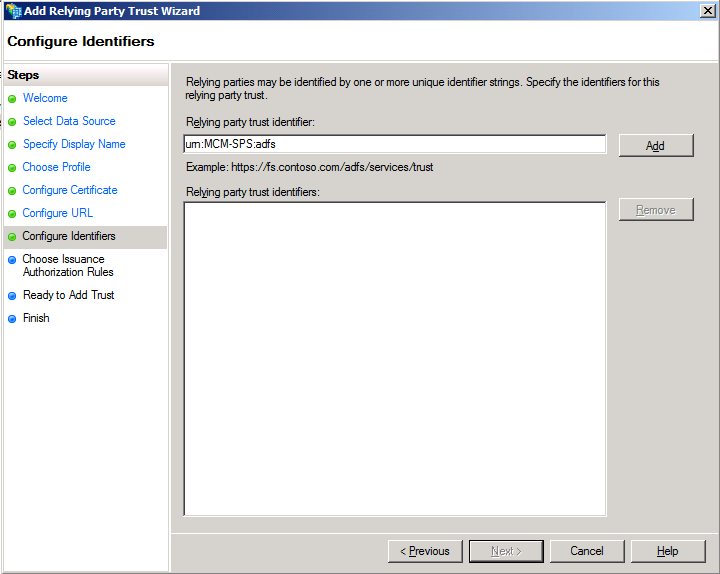
Meanwhile, back on the SharePoint Server … When you create or transform a web application to support claims based authentication, it creates a folder called ‘_trusts’. We will make reference to this location in the next step.

Back to the AD FS server …

By default, you will see https://www.mcm.lab.interal/_trust/. Note the ‘/’ at the end!!!!! We will remove this and add ‘urn:MCM-SPS:adfs’.
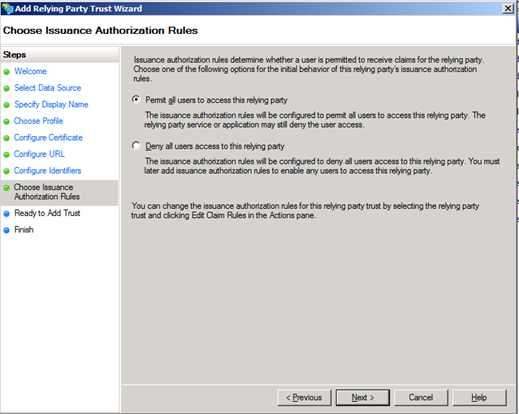
Once this wizard completes, we will create a new Claim Rule.

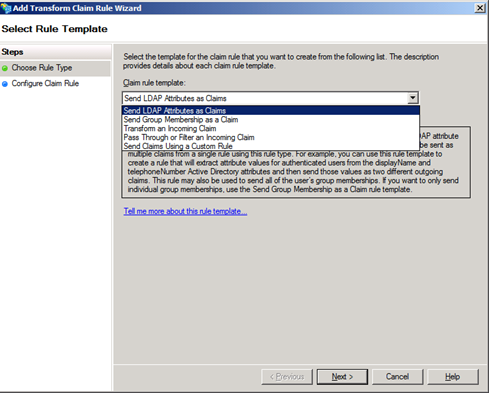
We will be using the email from AD as the information that goes into our “Claims Augmentation” token. You can select any number of properties, but for the sake of this demo, we will just select email. You will be able to follow the rules wizard diagrams below.


The bulk of our work is now done. Navigate through the nodes and examine the different pieces of data.
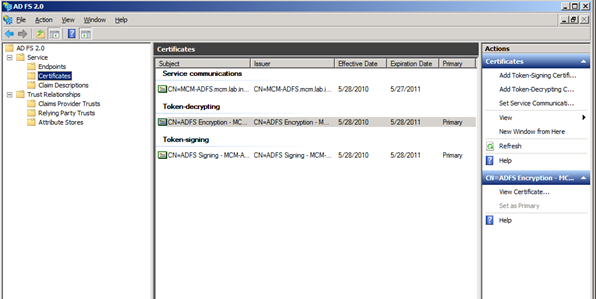

We will now select the ‘Token-Signing’ certificate and import it. Notice from the diagram below that the CA Root certificate is not yet trusted.


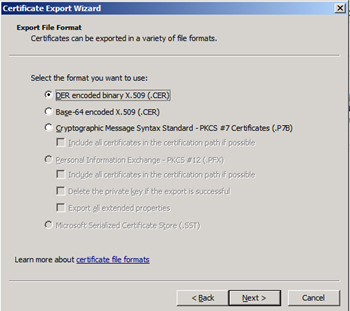
Once you complete the import, you should have a clean looking certificate. Click on the ‘Details’ tab and export this certificate to the certificate folder on the C drive.


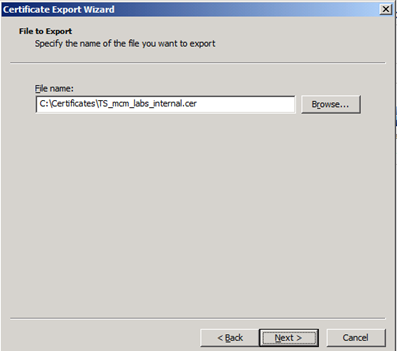
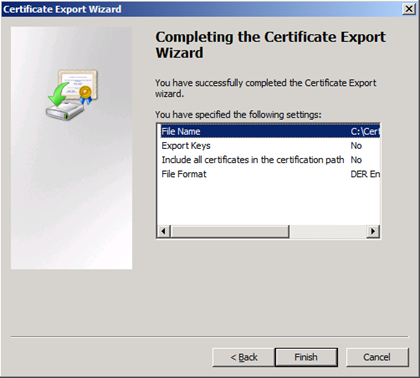
You will need to copy this certificate over to your SharePoint server and place it into the certificate folder on the C drive. We will have a couple of PowerShell commands that are dependent on the location of this file. On the SharePoint server, open up the SharePoint 2010 Management Shell.
Add the ADFS Token Signing Certificate Root Authority To SharePoint’s List of Root Authorities
Here we add the root certificate used in ADFS token signing to SharePoint’s list of trusted root certificate authorities.
Open the SharePoint Management Shell to run the PowerShell commands. If you modified any of the demo, you will need to pay special attention to the variables used here. $signinurl will send the request from SharePoint to the ADFS server.
- $certPath = “C:\Certificates\TS_mcm_labs_internal.cer”
- $cert = New-Object System.Security.Cryptography.X509Certificates.X509Certificate2(“$certPath”)
- $map1 = New-SPClaimTypeMapping “http://schemas.xmlsoap.org/ws/2005/05/identity/claims/emailaddress” -IncomingClaimTypeDisplayName “EmailAddress” -SameAsIncoming
- $realm = “urn:” + $env:ComputerName + “:adfs”
- $signinurl = “https://mcm-adfs.mcm.lab.internal/adfs/ls/”
- $ap = New-SPTrustedIdentityTokenIssuer -Name “ADFS20Server” -Description “ADFS 2.0 Federated Server” -Realm $realm -ImportTrustCertificate $cert -ClaimsMappings $map1 -SignInUrl $signinurl -IdentifierClaim $map1.InputClaimType
You will need also add the certificate to the SharePoint Trusted Root Authority. You will be able to do this will the following PowerShell cmdlet:
- New-SPTrustedRootAuthority “MCM Lab ADFS Token Signing Trusted Root Authority” -Certificate $cert

Once you complete the PowerShell scripts, you will be able to modify the Authentication of the web application to use ‘MCM ADFSv2’. Make sure that you make this change of the ‘Intranet’ zone and not your ‘Default’ zone.

When you navigate to your site, you should be prompted to select your authentication type.


We will expand on this in the next article and create an external farm that will access this site through an AD FS trust.

Regarding “When you create or transform a web application to support claims based authentication, it creates a folder called ‘_trusts’”
I never could get SharePoint to create the ‘_trusts’ folder. I tried a new CBA web app with NTLM, a new CBA web app with Kerberos. Maybe I’m missing some other prerequisite.
Brad,
I will look into exactly when this folder gets created and let you know.
Shannon
This folder get’s created when you add ADFS to your web application as an authentication method.
You need to define the Root Auth first and then create a new site where the ‘_trust’ folder is automatically created. At-least that’s what is happening for me.
Although I still can’t go beyond the “Server Error in ‘/’ Application” error message. Any help?
I noticed one more thing, for me “-ImportTrustCertificate $cert” didn’t work, I had to “-ImportTrustCertificate C:\Contoso.cer” and likewise for “-Certificate $cert” to “-Certificate C:\Contoso.cer”
-Hitesh
Got it resolved, I forgot to install Claims Agent on Sharepoint Server..ugh..
Thank you for the detail steps, when I am running this step “Add the ADFS Token Signing Certificate Root Authority To SharePoint’s List of Root Authorities”
$cert = New-Object System.Security.Cryptography.X509Certificates.X509Certificate2(“C:\cert\sts-ts.cer”)
$map1 = New-SPClaimTypeMapping “http://schemas.xmlsoap.org/ws/2005/05/identity/claims/emailaddress” -IncomingClaimTypeDisplayName “EmailAddress” -SameAsIncoming
$realm = “urn:” + $env:ComputerName + “:adfs”
$signinurl = “https://servet name/adfs/ls/”
$ap = New-SPTrustedIdentityTokenIssuer -Name “ADFS20Server” -Description “ADFS 2.0 Federated Server” -Realm $realm -ImportTrustCertificate $cert -ClaimsMappings $map1 -SignInUrl $signinurl -IdentifierClaim $map1.InputClaimType
I get error:
New-SpTrustedIdentityTokenIssuer : The farm is Unavailable
Sharepoint server and AD FS 2 server are in same domain.
Really appreciate for the comments
Thanks
Hell Kanta,
It sounds like you might not have the correct permissions on the SharePoint databases. Check out this post for more info. If this doesn’t get you past it, shoot me an email at sbray@go-planet.com and I will see if I can help you find the issue.
http://ddkonline.blogspot.com/2010/03/list-of-permissions-required-for.html
SWB
Thank you Shannon, for your quick response.
That was infact the permission issue. Now I have anothe error. That is:
When I browse the sharepoint site; it brings the “Sign In” Page. I selected the provider and it redirects to https://server/adfs/ls error is:
There is a problem accessing the site. …. and Reference number d9eaf33a-0287-4ea5-b05dcbdaf461.
This reference number keeps changing.
What could be the problem, I could not see any log that gives me clue.
Thanks
Hello Kanta,
Have you checked the ADFS logs or just the SharePoint logs?
Shannon
Hello Shannon,
I don’t see any error in ADFS or Sharepoint log?
Kanta
I followed the stteps to authenticate user from ADFS 2.0 with SharePoint 2010 web Application .
I got this problem not able to find the couse of it. I have given read permission to serviceaccount and App pool acount. still I get this error. Any suggestion is appreciated.
Server Error in ‘/_trust’ Application.
——————————————————————————–
The trusted login provider did not supply a token accepted by this farm.
Description: An unhandled exception occurred during the execution of the current web request. Please review the stack trace for more information about the error and where it originated in the code.
Exception Details: System.ServiceModel.FaultException: The trusted login provider did not supply a token accepted by this farm.
Source Error:
An unhandled exception was generated during the execution of the current web request. Information regarding the origin and location of the exception can be identified using the exception stack trace below.
Stack Trace:
[FaultException: The trusted login provider did not supply a token accepted by this farm.]
Microsoft.IdentityModel.Protocols.WSTrust.WSTrustClient.Issue(RequestSecurityToken rst, RequestSecurityTokenResponse& rstr) +328
Microsoft.IdentityModel.Protocols.WSTrust.WSTrustClient.Issue(RequestSecurityToken rst) +36
Microsoft.SharePoint.SPSecurityContext.SecurityTokenForContext(Uri context, Boolean bearerToken, SecurityToken onBehalfOf, SecurityToken actAs) +19063094
Microsoft.SharePoint.SPSecurityContext.SecurityTokenForOnBehalfOfContext(Uri context, SecurityToken onBehalfOf) +54
Microsoft.SharePoint.IdentityModel.SPFederationAuthenticationModule.OnSessionSecurityTokenCreated(SessionSecurityTokenCreatedEventArgs arguments) +357
Microsoft.IdentityModel.Web.WSFederationAuthenticationModule.SetPrincipalAndWriteSessionToken(SessionSecurityToken sessionToken, Boolean isSession) +92
Microsoft.IdentityModel.Web.WSFederationAuthenticationModule.SignInWithResponseMessage(HttpRequest request) +360
Microsoft.IdentityModel.Web.WSFederationAuthenticationModule.OnAuthenticateRequest(Object sender, EventArgs args) +247
System.Web.SyncEventExecutionStep.System.Web.HttpApplication.IExecutionStep.Execute() +80
System.Web.HttpApplication.ExecuteStep(IExecutionStep step, Boolean& completedSynchronously) +171
Thank you
kanta
I am going through these steps and re-doing this to make sure the steps are all there.
Great Work dude..
Really informative….Keep up the good work.
Thanks once again 🙂
Hi Shannon,
The link on Configuring Windows Server 2008 for Virtualization is not functional.
I am getting an Page Not Found Error.
I have fixed the link.
The signin page redirects me to https://myservername/adfs/ls
I’m getting 404 on this url. Did I miss something?
Hello Lukasz,
Follow the steps on the next blog post to ensure you got everything.
https://shannonbray.wordpress.com/2010/10/02/claims-based-authentication-made-simple/
These have been verified step by step. I am travelling a bit this week, but shoot me an email and I will be glad to help: sbray@go-planet.com
Awesome! got my guy logged in. I had to jump through a small hoop where I needed to specify an EncryptedSecurityTokenHandler certificate in the SharePoint Web.Config, not a big deal, but I wonder why I was so unlucky.
Hi Shannon,
thanks for your post and the updates in the second post… I stepped into the same problems but I was able to solve it with both posts doing step by step.
Thanks